Installation, Virtual Server , Location block basics | Nginx Tutorial #1

Principal Architect | Driving Cloud Transformation & Application Modernization with AWS & IBM Cloud | Serverless & DevOps Leader | Industry Speaker
NGINX Getting Started
A few months back, I published an article on Introduction to Nginx and its advantages. I received a lot of support and encouragement from friends, and colleagues which motivated me to come up with a series on Nginx.
Do Subscribe to my Youtube channel “Durgadas Kamath” to get updates on videos. I have created a playlist called Nginx where I plan to upload tutorials on Nginx features, best practices, Docker files etc.
So Let’s get started.
Here is the video I published on Youtube. Do like and Share with friends/colleagues etc.
Nginx Installation
Nginx is available for all operating systems but it was created to be used to work with Linux systems primarily. While Windows binary is present in the Nginx downloads, it is not recommended for Production use due to Low Performance, Single worker process and no support for modules. I would recommend you move to a Linux based system. On Windows, you can make use of Windows Subsystem for Linux (WSL2) and install Ubuntu distribution.
The simplest way to install Nginx is via Package Manager. You can execute the below commands to get started:
Ubuntu: apt update && apt install -y nginx
CentOS/RHEL: yum install epel-release && yum install nginx
If during installation, you get any permissions issues, prefix the commands with ‘sudo’. You can check the installation status using service nginx status , if it's in stopped state you can start it using service nginx start
Let’s verify the process once the Nginx is started. You can execute ps aux | grep nginx
~ ps aux | grep nginx
root 13531 0.0 0.0 12164 3668 ? Ss Mar26 0:00 nginx: master process /usr/sbin/nginx
nobody 22338 0.0 0.0 12600 3836 ? S 03:20 0:00 nginx: worker process
…
As you see there is 1 Master process and a single worker above. A number of worker processes could vary on your installation as recently, it's set to auto which forces it equal to the number of CPUs in your machine i.e if your system is a dual-core (2cpu) then there will be 2 worker processes. This can be changed by modifying the property in nginx.conf.
By default, the Nginx is started on port 80 and you can check by hitting http://localhost in the browser which will serve the default Nginx page.
Virtual Server
Since we are done with the installation, let’s create our first Virtual Server where we will replace the default Nginx site with our own.
On my file system, I have placed a simple website consisting of index.html, style.css and banner.png
➜ ~ cd /home/durgadas/learn/website
➜ website tree
.
├── banner.png
├── index.html
└── style.css
0 directories, 3 files
So let’s open /etc/nginx/nginx.conf in the editor and clear all the sample configurations with the below one. It’s always good to understand from scratch.
events {}
http {}
The first step, we need to create a Server which indicates which domain our website needs to be served, what is the port and where to look for the files.
So let’s look into it. To achieve the same, you need to place the below block in the http context.
event {}
http {

include mime.types;

server {
    listen 80;
    server_name localhost;
    root /home/durgadas/learn/website;
    }
}
Let’s see what each of the lines does.
include mime.types: when we serve any files, it always returns with Content-Type: text/plain and that results in incorrect rendering on the browser. To overcome it, Nginx comes up mime.types file which is included in the/etc/nginxdirectory. This file contains all the file types and the corresponding Content-Type values. for e.g if the file has a.cssextension, it will set the Content-Type astext/cssserver: This context defines the virtual server and contains various directives like:
listen: this is the port at which your domain is serving the request. Mostly it's either 80 or 443. In our case, we serve it at port 80
server_name: This is the domain name at which the assets need to be served. It could be a domain, subdomain, wildcard or even IP address.
root: This is the path on your filesystem from where the website/assets need to be served. The above location in the snippet contains the path where I had the 3 files (as seen above).
Validate Configuration and enforce configuration changes
Once you make changes to your configuration file, you can check for validness by issuing the following command nginx -t . If everything is good, you should message like below
~ sudo nginx -t
nginx: the configuration file /etc/nginx/nginx.conf syntax is ok
nginx: configuration file /etc/nginx/nginx.conf test is successful
For changes to be reflected, you can run service nginx reload . Reload command is preferred over stop and starts as it ensures that your server is never down due to configuration issues. Would recommend always using the reload command.
Once the reload is successful, you can hit http://localhost and it should serve your website. Also, check for the Content-Type header value in the responses for the files downloaded using the Developer tools.

Since the setup is like a web server, you can access the files directly on the location for e.g http://localhost/styles.css .
Interestingly, if you try accessing any other path for which the files are not present in the location that you are serving, you will receive an Nginx Not found page.
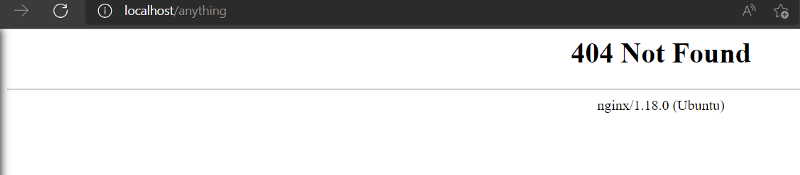
To handle or serve pages at a location which doesn’t exist,you will need to make use of location blocks.
Location blocks
location blocks define which path needs to be evaluated and how it needs to be handled. Let’s just look at the basics for now in this article.
Let’s say you want to return some message when someone hit /anything in the browser. We can define it as follows. Add this block below the server context.
location /anything {
    return 200 "Hello Friends, how are you? PREFIX match"
}
Once added, reload the configuration and hit /anything in the browser. You should see the message that you have defined.
The above is known as Prefix Match so if you hit anything that starts with what you have defined, it will still work i.e /anythingXYZ will also get evaluated by the above block. If you want to match it exactly then you can add = between location and path.
location = /anything {
    return 200 "Hello Friends, how are you ? EXACT match"
}
In addition, you can also define “Regex” paths using the ~ operator .
e.g
location ~ /anything[0-9] {
    return 200 "Hello Friends, how are you ? REGEX match"
}
The above example indicates that any number that follows /anything should be evaluated. If there is a collision between the Regex match and the Prefix match based on the rules, the REGEX match will take precedence. If you still need Prefix to take precedence, you can add ^~ to your prefix location block.
location ^~/anything {
    return 200 "Hello Friends, how are you? EXACT match"
}
This is all I wanted to cover in this article. In upcoming articles, we will see more advanced configurations like Rewrites, Logging, Reverse Proxy and much more.
Clap, share, comment, and give me feedback. I’d love to hear your thoughts!
Happy Learning. Do follow to get updates on upcoming articles.